Senin, 08 April 2013

Have you cut the cord, but still want to watch some cable TV? Then stream it

So far we’ve cut the cable TV cord and maximized our over-the-air (OTA) antenna reception including the sharing of a coax cable with an Internet feed. While I extol the virtues of cutting the cable cord (one million people cut the cord in 2012), there are moments when I long for a quip from Stephen Colbert or really want to watch a U.S. men's or women's soccer match. At least for soccer, my only viewing options are to go to a bar, invite myself over a friend's house, or hide in the bush in front of my friend's house and watch it through his living room window.

But there's actually another choice...a media server! Join me as I walk you through this exciting world! And use an exclamation point for three sentences in a row! This is the fourth and final chapter in this OTA adventure, so in case you missed what has been covered so far, here's a recap:

Chapter 1 - Receive HD channels on your TV with an over-the-air (OTA) antenna

Chapter 2 - Optimize the antenna signal for all TVs with splitters

Chapter 3 - Run an antenna's signal on the same cord as your Internet feed

Chapter 4 - Stream videos from cable stations with a media server

Your streaming media setup will look something like this.

Media Server Concepts
A media server takes many forms; in our case I'm referring to a device that provides a more comfortable experience (interface) to watch online movies and TV shows on your TV.  A media server visits streaming media web sites, pulls their content in, and displays the content in an interface on your TV that's easier to navigate.

Still having trouble understanding?  That's okay.  Put it this way, you could either visit the local farmer's garden for fruits and vegetables, the butcher for your meat, and the five-and-dime shop for your cereal, or go to the supermarket that pulls all of these together and presents them more conveniently. You guessed it, the supermarket is a media server.

Popular streaming media sites include YouTube, Hulu, and Netflix.  Hulu streams network and cable programming with "limited commercial interruption" they're quick to point out. Hulu's basic service is free, but for a little less than $10/month, you get access to more shows and they're available sooner than basic users. A monthly subscription of $7.99/month is required for Netflix's streaming service. These sites work like YouTube except they offer different programming.

To watch streaming media from you computer, just point your browser to these sites, pick your show, and press play. Let's say for the purpose of this post that you'd rather watch streaming media from your couch.

Streaming Media Access
In addition to visiting Hulu, Netflix, and YouTube for entertainment, all networks (CBS, NBC, FOX, and ABC) and many cable channels offer most of their shows on their web sites by navigating to their "view this show here" links to watch what you want for free.

I have a monthly subscription to Netflix streaming and have been very pleased with its performance. I'm able to view Netflix content at my computer, or sitting on the couch via my TiVo, PS3, or Wii. I prefer the PS3 because its Netflix interface is smooth and responsive. It's great watching entire seasons of programming without commercials.

Cable channels that already require a separate subscription like HBO (whose streaming service is called HBOGO), and a selection of ESPN's live programming require you to verify that you already pay for those channels (which you don't if you cut the cord). You won't get to watch HBO or every game on ESPN, but let me remind you that it shouldn't stop you if you have a sight line into your friend's living room. Amazon also offers a streaming service that requires a subscription, but it's free for Prime members.

Media Server Choices - Just Your TV
Some of today's HDTVs are well connected to the Internet and may already offer improved interfaces for selected streaming sites like Hulu, Netflix, and YouTube. If that's the case, by all means go ahead and watch away by following your TV's instructions. If not, let's keep going and talk trash about those fancy TV owners. Such showoffs, they are!

Media Server Choices - Roku, Apple TV, Google TV, Netgear NTV300, and Boxee Box --> TV
These are names of boxes, about the size of your digital camera, that connect to your Internet router to pull streaming media and then display it in the user-friendly way I've been promising.  My media server setup does not involve any of these devices. If you want more information about them, visit a site like

Media Server Choices - PC Software --> PS3/XBox/Wii --> TV
Another option is to use your computer as a media server device. The software uses your computer to take your Internet feed, grab the latest online offerings, and make them available on a variety of devices connected to your home network. From there you use that device, such as a PS3, XBox, or Wii, and watch the online offerings on your TV.

According to this Wikipedia page, there are tons of media server software choices. I'm not going to compare them here, but I will tell you that most will require you to pay for their services at a monthly, yearly, or one-time lifetime cost. Provided your computer handles streaming media well already, this software should run fine.
For my setup, I have been pleased with the performance of PlayOn for my media server software needs. After installing it on my computer with a lifetime subscription, I simply boot up my computer which runs PlayOn from the start, turn on my PS3 and TV, and I'm off and watching. PlayOn offers tons of content, improves the software regularly, and works seamlessly with major home devices.

Another piece of PlayOn software that's intriguing is its PlayLater program that records streaming media. I haven't tried it out, but it sounds great if you can delay your viewing while a program is recorded so you can watch it later and not sweat any buffering delays. The company does offer sales for lifetime memberships.

Peace and Tranquility
No longer viewing cable TV's content was tough at first, but then something funny happened...I found that life did go on without its filler programming. I still watch the same amount of TV, but instead I feed my viewing needs with other, cheaper, sources of TV entertainment. I pay a monthly subscription for Internet access (which I'd have anyway) and Netflix and have paid in full for the OTA antenna and PlayOn software. My monthly cost is still a fraction of what it was to be entertained and I don't have to deal with poor cable TV billing practices.

I hope these four rambling posts have caused you to at least consider cutting the cord and joining the revolution.

Sabtu, 23 Februari 2013

Can You Run OTA Antenna TV and Internet Feeds on the Same Coax Cable? Yes!

So far we’ve cut the cable TV cord and maximized our over-the-air (OTA) antenna reception for our TVs; however, if you're like me, there's a snag with sharing the antenna's signal with a TV that also depended on one coax (that's a coaxial cable if you're new to these procedures) to provide cable TV and the Internet feed.  Fear not, for I would not lead you astray and will show you the way.  This is the third chapter in this OTA adventure, so in case you missed what has been covered so far, here's a recap:

Chapter 1 - Receive HD channels on your TV with an over-the-air (OTA) antenna

Chapter 2 - Optimize the antenna signal for all TVs with splitters

Chapter 3 - Run an antenna's signal on the same cord as your Internet feed

Chapter 4 - Stream videos from cable stations with a media server


When my cable TV was installed, a coax was run from the cable box on the bottom floor to the upstairs TV, which is where my main antenna is now located.  When I went about maximizing my reception, I wanted to use the coax installed by the cable company to feed the signal from the main antenna upstairs back down to the single coax connected to the downstairs TV.  The problem was that the coax from the cable box to the downstairs TV was still being used to connect me to the Internet (you only need one coax to run cable TV and the Internet).  Because cable TV and the Internet feed use the same signal, a simple splitter is all that's needed to give the TV its channels and your Internet router its Internet data.

The fix in my head was to combine the main antenna's signal with the Internet feed on one coax...if that was even possible.  I did lots of research on audio/video forums to see if this was possible and almost everyone said it was impossible.  Most said that you could not run the two different signals on the same coax because they run at different frequencies, there’s an issue with interference, and the gods would not allow it during the summer solstice.

However, I found one person who said you could use a device called a diplexer.  It sounds ominous, but really it’s friendly once you get to know it. It took plenty of research to confirm that a diplexer would do the trick so let's hope you found this blog in less time than it took me to learn about diplexers and type this entry.  Here’s how I used to diplexers to help cut the cord and solve this problem; your setup may differ, but the concepts still apply.
Step 1 - Return to your sketch in chapter 2 of the optimal setup for your OTA signal, now knowing that you can run the OTA signal on the same coax as your Internet feed. Recall that using one antenna’s signal on multiple TVs does not decrease the video quality even when they’re all on and showing different stations.

 In my case, the "satellite antenna" is the Internet service provider's feed to the house, the red line is the single coax that carries both streams, and the "satellite signal" is the Internet feed that finds its was to the router. 

Step 2 - One diplexer is needed to combine the antenna signal and Internet feed and another diplexer is necessary to (re)split them. Diplexers look like splitters and have all female ends just as splitters do. Go online or your electronics store and purchase your diplexers and connectors as necessary, holding onto that receipt just in case this whole experience fails. 
 
Step 3 - With your diplexers in hand, setup your main antenna and run its signal down to where you want to combine it with the Internet feed. It's okay to use a splitter anywhere in the feed’s path, no matter how far from the combination point, to reach other TVs before the fancy combining happens.

Step 4 - Go where you want the antenna’s signal to combine with the Internet feed.  Based on my story, this was outside on the first floor because of where the Internet (and cable TV) box was located.

Step 5 - At the combination point, you should have a free hanging coax with a male end that finds its way back to the main antenna.

Step 6 - Take one of the diplexers, we’ll call it diplexer A, and locate the side with two connectors (the bottom side in the picture above).

Step 7 - Screw the male end of the coax from step 5 into one of the bottom side diplexer connectors, the side with more than one connector on it.

Step 8 - Unplug your router (and modem if you have one).


Step 9 - Locate the box that pulls the Internet feed into your house, this is probably the same as what was/will be your cable TV box.

Step 10 - Connected to the Internet box is a coax that runs into your house and is split with a familiar looking splitter.  Disconnect this coax from the splitter, or closest connection point to the box, leaving the other end of the coax connected to the Internet box.

Step 11 - Take the free hanging Internet feed's coax (and its male end) and screw it into the other “IN” female connector of diplexer A.

Step 12 - At the combination point, you now have diplexer A being fed the signal from the main antenna and your Internet feed.


Here's my setup proving something, I'm just not sure yet.

Step 13 - Locate the coax that runs into your dwelling; one end should still be screwed to the splitter that was connected to the Internet feed's coax.

Step 14 - Unscrew this coax from the splitter.  Congrats, you’ve got a free splitter from the cable company!

Step 15 - Take this same coax and screw it to the “OUT” female connector of diplexer A.

Step 16 - If all is well, diplexer A still has the antenna coax and Internet feed coax connected as inputs, and now has the coax that goes into your house connected to its output.

Step 17 - Take hold of the other diplexer, let’s call it, oh I don’t know, diplexer B.

Step 18 - Follow along the coax that goes into your house and locate its other end where you want to (re)split this super-mega-awesome combined feed.  In my case, the cable company setup a coax that ended with a splitter sending the signal to the TV and Internet router.

Step 19 - Connect this main coax to the “OUT” female connector of diplexer B (it's the lonely port in the picture above, you can't miss it.  Well I guess you could miss it, but then this whole thing won't work well).

Step 20 - From the indoor splitter near you, unscrew the coax connected to your home's Internet router and then unscrew the coax that connects to your TV.  Again, you're removing them from the splitter and not the router or TV.  The router and TV will keep their coaxes attached.

Step 21 - Locate the coax that runs to your home’s Internet router and screw its free end to a connector on diplexer B with multiple connectors (bottom of the picture above).  In the pictured diplexer, the bottom connectors now become "OUT" connectors and the connector that's alone on one side becomes an "IN" port.

Step 22 - Locate the TV’s free coax and screw it to diplexer B’s other “IN” or “INPUT” port.  If you want to run multiple TVs from this feed, connect a splitter to this port on diplexer B and connect TVs from there as usual.

Step 23 - Turn on a TV connected to the diplexer and see if you receive signals as done in Chapter 1, step 19.

Step 24 - Any luck? If so, high five yourself, I may have been speaking the truth afterall.

Step 25 - Turn on all TVs receiving the main antenna’s feed and see if they receive channels too, setting them up as necessary.  Pretty cool how you can watch different channels on each TV at the same time, right?

Step 26 - Plug in/turn on your Internet router and let it reconnect to the Internet; then plug in/turn on your modem and let it reconnect to the router.  These devices should reconnect to the Internet on their own.  If you see lots of lights flashing in good ways then we’re doing alright.

Step 27 - Find yourself a device that connects to the Internet and see if it can connect. Any luck? If so, give yourself two high fives! You may now have every TV tuned to different channels while streaming Internet video without any issues on any of them.  As with any antenna signal splitting, channel reception is tied to the quality of a single antenna, but it should have been placed in a location that nullifies this issue.

Step 28 - Congratulations! You are now running the OTA antenna signal on the same coax as your Internet feed, have maximized the signal for every connected TV, and can wow people at your next cocktail party by saying things like, “I spent the weekend working with coaxes, splitters, and diplexers and I’m awesome.”

In the fourth and final chapter, I’ll talk about replacing some of those cable channels you used to watch by relying on a media player and streaming video.

Senin, 11 Februari 2013

Optimize Your OTA Antenna Signal With Splitters

In my first post about cutting the cable TV cord, I showed you how to cut the cord and receive over-the-air HD channels.  At the very least you now have one TV connected to one antenna, or maybe multiple TVs with their own antennas.  We can improve this design, using the best antenna for every TV's signal, even when they're on at the same time.

Here are the chapters to follow me on this journey to glorious HDTV goodness:

Chapter 1 - Receive HD channels on your TV with an over-the-air (OTA) antenna

Chapter 2 - Optimize the antenna signal for all TVs with splitters

Chapter 3 - Run an antenna's signal on the same cord as your Internet feed

Chapter 4 - Stream videos from cable stations with a media server

Before you entertain the thought of using your best antenna location for every TV, you will need to have a coaxial cable (coax) running from the best antenna location to whichever TVs you have in mind.  If your antenna's on the top floor and the TV's on the bottom floor, my advice won't help you if there's no coax between the two of them. Because you purchased an antenna to stop your cable TV service, it's likely that your cable company ran a coax to every TV in the house, meaning this might just work after all.

In my case, I wanted to connect my TV that's downstairs to the TV and its antenna that's upstairs.  Because the house was wired for cable TV, the TV that's upstairs has a coax from its location down to where the cable box used to be.  Meanwhile, the TV that's downstairs is still near that same cable box area.  Because the wiring is already done, this won't require me to drill holes through my walls.

This blog post is much more interesting if your living quarters have coax running between whatever rooms you need from the prime antenna location.  Let's assume that's the case so we can start the steps.

Note: The antenna may be hooked up to a TV or another device capable of searching for OTA channels.  For example, my OTA antenna is hooked up to my TiVo, just as I used to run my cable TV through the TiVo.  For this blog, assume "TV" means whatever device you're using to search for OTA channels.

Step 1 - Make a drawing of your setup from the main antenna to the other TVs, noting where the coax would have to split to reach each TV, including the need to add coaxes as necessary.  Don't worry, I won't judge the drawing's quality, it just has to make sense to you.

Step 2 - Determine how many splitters to purchase.  What's a splitter you ask?  Well a splitter splits a single coax signal, in this case the main antenna's, and sends it to coax outputs.  The most common splitter takes one signal from a coax and splits it into two signals.  Larger splitters split the signal into three or more signals as in the diagram below.  In my case, the main antenna's signal had to be split to one other TV meaning I would need one splitter to split the signal to two outputs, allowing the antenna to work with its normal TV and the one downstairs.

 This diagram gives a good idea of what we're trying to accomplish with a splitter.

Step 3 - Now that you know how many splitters you'll need, also note how many coaxes you'll need.  Look at your drawing and note how many coaxes are needed and how many you have; also consider if you need to extend a coax by connecting it to another cable.

Step 4 - Each coax has two male ends and a splitter only has female ends.  Look at your drawing again and for each connection point, note each side's male or female end.  Do you have two male ends connecting?  Maybe two female ends are connecting?  For these conflicts, you'll need female-to-female coax connectors or female-to-male coax connectors to bridge the issue.  Make a note of what you need to purchase.

Step 5 - When you think you've got the right number of splitters, coaxes, and connectors for your design, look online or visit your local electronics store and buy the items.  These are rather basic audio/video products so they're found everywhere.  As always, keep your receipt in case you need to return items and check the store's return policy for opened items.

Step 6 - Optimize the main antenna's location.  You already have a nice reception, but see if you can improve it by moving the antenna, adjusting its rabbit ears, or turning it in a new direction.  Then see if you can receive even more channels; this may require you to rescan for available channels.

Step 7 - Note the main antenna's optimal location.  The antenna will probably move during this chapter so this makes it easier to come back to when all is done.

Step 8 - Get all splitter(s), coaxes, and connectors in hand.  For this post, we'll assume you're in the same boat as me, requiring just one splitter.  Your home's coax, splitter, and connector needs will vary from my experience, but the same ideas apply.

Step 9 - Locate or place whatever coaxes you need to connect other TVs in your home.

Step 10 - Unscrew the main antenna from the TV or device it's connected to. 

Step 11 - Take the main antenna's coax cable and screw its male end into the splitter's female "IN" coax port.  As with all coax connections, tightening it with your hand is enough and it doesn't have to be super tight.

Step 12 - Take a coax and screw it to one of the splitter's "OUT" coax ports.  This should be a male-to-female connection.

Step 13 - Take the other end of this coax and connect it to the TV's coax port.

Step 14 - For the TV that's a new addition to this antenna, take its coax and screw it to the other splitter "OUT" port.

Step 15 - Take the other end of this coax and connect it to the TV's coax port.

Step 16 - If all is well, you now have a single antenna providing a signal to a splitter, and from that splitter there are two coaxes running to two TVs.

Step 17 - Return the main antenna to its optimal location noted in step 7.

Step 18 - Run a channel reception search for each TV; this can be done at the same time.  Both TVs should find the same stations.  If they don't list the same stations, it's because one of the TVs doesn't consider a station with low reception worthy of saying it is available, while the other one does.  If you connected more than two TVs to the splitter, repeat this process with each TV.

Step 19 - Congrats!  Now your TVs have the best OTA reception possible and they can watch TV at the same time.

In my next post, I'll introduce you to the world of diplexers which solved my problem of running an OTA antenna's signal on the same coax as my Internet feed.

Selasa, 08 Maret 2011

NOTM: Metro Rider Avoids Giving Seat to "Undeserving" Elderly Woman

Rockville, MD - Rush hour Metro rides can be hellacious. Long commutes without sitting are torturous. And not giving up a seat to an elderly woman is obnoxious.  Morris Herlis' was obnoxious to avoid the torture of a hellacious ride this morning and NOTM was there.

Morris rides the red line from Shady Grove to downtown D.C. every weekday morning. "I hate getting on a train after 7 [am] 'cause you have to deal with the 'bus people'." The Shady Grove station is an important bus terminal for Montgomery County. "They go to the turnstiles as one mass of humanity and I have no shot at a seat. Such arrogance." Morris' claim that they smell, get caught in doors, and are "lame" were unfounded by NOTM.

"If I'm really running late and catch a train around 8 [am], I not only deal with a greater concentration of bus people, but also the older folks who don't move quickly." Morris, not one to shy from ageism, is not a fan of any demographic other than the one he's in.

Morris doesn't discriminate.  Bus people of all kinds are obstacles to his Metro ride.

When NOTM caught up with Morris this morning, he was on the train at 8:17. Having ran through the tunnel to beat the latest wave of bus people up the escalators, he grabbed the last empty seat - a seat for the disabled and elderly when necessary. He sat next to a man in a full leg cast and across from a blind woman and a man with a walking cane.

Morris read his Washington Post Express without issue until the White Flint stop. It was there that 78-year-old Beth Steinkatz, one month removed from her second broken hip surgery in the last year, boarded the train. Unable to maneuver herself into one of the row seats many had offered her, she assumed the least disabled and elderly rider sitting in the four special seats would offer her a place to rest.

Never one to be kind, generous, and charitable, Morris buried his head in the newspaper. "The moment I saw granny weeble-wobbling her way aboard, I kept reading. I kept my eyes low enough because keeping my seat mattered."

This is a NOTM reenactment of Ms. Steinkatz and her cane if she was a he.

Ms. Steinkatz continued staring down Morris, but to no avail. Pleas from passengers to "standup and don't be a douche" and "stop being a jerk, we know you hear us" had no effect. Ms. Steinkatz had no choice, but to stand the rest of the way.

Finally, Morris neared his stop, well rested to be sure, and got into position for his station. "I'm at the door one station before mine so I can easily beat the bus people and everyone else out to my station's exit. Nobody wants to be behind the stench of those weirdos."

The door opening chime rang as Morris stood by the door. Ms. Steinkatz took her cane and jammed it into his back, not-ever-so politely pushing him out the door - one stop early. Amid clapping and cheers, she took Morris' seat and waved goodbye to him and his sullen face on the platform. 

Sabtu, 12 Februari 2011

How to be Romantic on D.C.'s Metro

Let's say you're a regular Metro commuter on your way home this Monday when you realize that it's Valentine's Day and you have nothing for your significant other (SO). Here are some tried-and-true options that are all around you.

Go retro with anti-E-readers. Anyone can buy a Kindle or iPad for a SO, but you're better than that; you're not a lemming. So go retro by bringing home a copy of the Washington Post Express and Washington Examiner. If your SO's a newshound and has a political lean, only bring one of them home lest you want another fight with your SO.

Soon an entire generation won't know which came first.

Create a tapas dinner. Though Metro's no food or drink policy has been around a long time, that shouldn't stop you from providing a grand tapas meal. Go on and grab the partially opened bag of Doritos on the window pane, the box of Sour Patch Kids from the floor, and the other half of that Otis Spunkmeyer chocolate chip cookie. If you're lucky, you might find some McDonald's chicken nuggets at the top of the escalator on your way out. Your SO would appreciate them even more if they're still in the box. Don't forget to wash things down with the almost empty bottle of Mountain Dew rolling down the aisle.

Grab a seat toward the back for optimal drink and food opportunities.

Provide chauffeur limousine service. If your SO is always asking for rides to and from the station, around town, or to the airport, grab some bus schedule pamphlets. They're great reading material after the retro E-readers and your SO won't have to bum rides off of you. When asked if you can give a ride to BWI, just say, "there's a bus route for that". If the SO is a world traveler, grab some MARC train schedules too. It's the gift that keeps on giving (you back your free time). SOs everywhere will be driven where they want, sort of when they want, and in vehicles that they may confuse for limousines if they're hallucinating.

Imply you want a future together. Near the bus pamphlets, grab a flyer warning you of future Metro repair delays and escalator outages. Earn bonus points by bringing home road construction public meeting notices too. These show that you're thinking about the future with your SO; at least how it'll impact your commutes. Nobody appreciates foresight and long-term relationship planning more than your SO.

Create a homemade romantic card. In this age of Twitter, you must be brief with your words. Pickup a Metro card from the ground and write something sweet on it using 15 characters or less depending on your handwriting size. "I love you" is only 10 characters, but "I don't care about our relationship enough to remember this day" is just too long and honest. Don't have a pen? Borrow one from the station manager or grab one from just below the third rail; I've heard there are some great Montblancs down there.

No SO can be upset when your card is covered with pandas.

Listen to live music - Plan A. Take your SO on a Metro ride around 9 am on a weekday, staying between Metro Center and Gallery Place. This ensures you'll overhear music playing on several incessantly loud iPods. If you don't like the genre, move to another car until you find one that sets the romantic mood. Keep changing trains to keep the musical jackpot surprises coming.

Listen to live music - Plan B. If your SO is picking you up from the station, have them park the car and walk back to the station entrance to take in the local and live music scene.  Undoubtedly, you won't find great musicians, but you might find the 5% that are bearable. If anything, you'll be hip to the area's up and coming guitarists, paint bucket drummers, and Peruvian flutists.

Buy a $5 bouquet of flowers. Flowers are a great sign that you care, even the wilted ones from the flowerseller outside the station. At $5 for a bouquet, you'll get credit for caring and being fiscally responsible by not buying from a local florist whose flowers are needlessly arranged well, tasteful, and better still - alive.

Bring home this Diego Rivera painting called "The Flower Seller" and you'll really make your SO happy.

Take the SO to an amusement park. If you follow Plan A to Listen to Live Music, remind your SO that a Metro ride doubles as a rollercoaster. Make sure you're both standing up and see who gets sick last from a herky-jerky manually automated ride. Maybe you want to impress by not grabbing a handle for balance - how athletic! It's a fun experience that's all included in the price of admission.

Just remember Valentine's day next year. If these don't match your SO's lofty expectations, then remind them that it's better than last year's gift - a jar of belly lint.

Senin, 31 Januari 2011

How to Install an Auxiliary Input (aPAC-NIS1) In a 2005 Nissan Altima

After installing my home speaker system last year, I decided that my 2005 Nissan Altima, called Silverman, needed an auxiliary input. I was tired of using my GPS' FM transmitter to listen to MP3s through my car's speakers and burning CDs is just sooooo passe. As a black belt master Googler, I scoured the web and bought an aPAC-NIS1 Aux Input.

There's just one problem...I've never stolen a car radio before. In this case, I'd just be modifying my radio, but how's it done? Turns out, all you need is a Phillips screwdriver, a willingness to bend dashboard molding, and the realization that the product's instruction writers should be fired. My chop shop resume is just beginning.

The aux input instructions in the package and online were awful. The writing (much like this blog!) was unintelligible so I got help from an engineer with advanced degrees. It's not that hard for Pacific Accessory Corporation (PAC) (or Pac-Audio) to hire a technical writer. Email me and I'll help.

One box, lots of wires, and the world's greatest fat-fingered hand model.

For one, please include a chart that tells me which DIP switches should be up instead of having me call your support line. Using a combination of Nissan forums searches, radio wiring diagrams, competitor instructions, and finally trial and error, Silverman now plays music, GPS directions, and cell phone chatter through its speakers, accepting any device with a headphone jack.

To help the greater good and fill a void in the Internet, allow me to help those in need of better instructions. Aux input inputters of the world, who are installing the same product in a 2005 Nissan Altima with a 6-CD Bose radio, let me guide you as we overcome aPAC-NIS1's disastrous instructions.

Sure, I could've paid $50 for someone to install it, but where's the fun in that when I got to be frustrated installing this device for several hours over two days. With some luck, it'll take you about an hour. Merchants selling the product offer instructions that contradict each other so while one method may be better, safer, and faster than mine, this one worked for me. In other words, it's completely your fault for following these and short-circuiting your car.

Step 1 - Disconnect the negative terminal from the car battery. As cool as it is to have your hair stick up from electricity, the rest of your nervous system won't like it much, along with your heart. My battery terminal was tough to remove so be ready for some elbow grease. We held the wire away from any metal with the wrench's rubber handle. Electricity likes metals so keep'em away like the two hormone-fueled teenagers they are.


Step 2 - look at your dash one last time and say a prayer. It's time to go in. Make sure your door is open in case you have to be hauled out of the car and let someone know what you're up to. Note that this device only works on an Altima radio with a satellite ("SAT") button.


Step 3 - pull the HVAC molding down and away from the dash. Do this gently. You'll need to bend the molding just enough to get your fingers behind it. Wow, this hand model actually has two beautiful hands!


Step 4 - remove the four screws holding the HVAC controls with a screwdriver. Unscrew the screws slowly and be sure you catch them as they come out. I kept them in my door pocket.


Step 5 - pull off HVAC controls by pulling the unit out from the bottom and then down. What glorious wiring to behold.


Step 6 - gently lift the molding for the vents from just below the radio controls. This is held in place by four clips so you will have to carefully pop it off of the clips. This can be very fickle so take your time. You may have to wiggle it and use a flat tool to pry it off.


Step 7 - remove the four screws that hold the radio in place. These are difficult to catch and not lose when they come out. I used my finger to keep the screw in place, but it didn't always work as I lost one of them into the abyss known as my car's innards.


Step 8 - Pull the radio out. You're almost halfway done. Well not really, just one-third.


Step 9 - look at the pretty wire colors one final time before adding even more complications.


Step 10 - disconnect the connection on the far left of the radio and the connection second from the right (when looking from above). These connections can be difficult to remove and may require a tool to push the little knob down and away to unlatch the plastic molding from the radio. As tempting as it is, do not pull the connections using their wires. A second set of hands is really handy here (ha!).

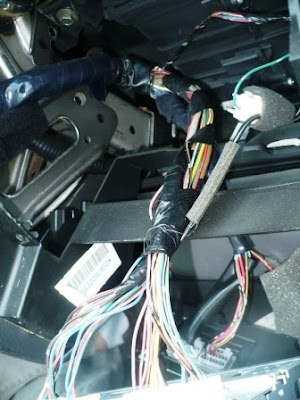
In addition to incomplete dashboard removal instructions, the instructions that came with the device and those on the web offered zero help in knowing which connections to remove from the radio. That's why I'm writing this very long blog entry that may not help anyone.


Step 11 - as part of the necessary trial and error, the radio eventually had all of its wires removed. So for your edification, here it is from the back, but don't actually remove all of the wires.


Step 12 - connect the audio cable (3.5 mm cable/RCA), used to input the headphone, to the aux input's blue box. For once, a picture isn't needed, right? Good, because I didn't take one.

Step 13 - connect the aux input's bound of wires to the radio using the only two connections that will fit and match the open radio ports. The connections will snap into place.


Step 14 - run the other end of the aux input's bound of wires down from the radio to behind the cubby that's below the HVAC controls. This is tricky and requires some maneuvering and small fingers. There's a small opening between where the HVAC controls are and the cubby that pops open below. The circled connection disappears behind the cubby in the second picture and may require pulling it down from the cubby too. Ultimately the wire will come out the cubby (see Step 24).

Again, nowhere is it discussed what you should do with the aux input wires so let this be that somewhere it is discussed.


Step 15 - set the aux input's blue box DIP switches to: 1 - down, 2 - up, 3 - up, and 4 - down. I had to call PAC Audio's support line for this. Heaven forbid a chart for all makes and models would be included.

Step 16 - connect the circled connection in picture 1 of step 14 to the aux input's blue box and pull a decent amount of wiring into the cubby. The cubby will store the blue box and your audio input device when used. So convenient!

Step 17 - place the radio back onto its holder in the dash (reverse step 8).

Step 18 - reconnect the battery's negative terminal (reverse step 1); you should hear the radio's CD changer cycle. Some instructions suggested waiting three minutes with the key turned to the "Acc" position before moving to Step 19, but I don't think it matters.

Step 19 - turn the ignition switch to "Acc", turn the radio on, and press the "SAT" button...what do you see on the display? If you see "NO SAT" then that's not good. If you see something like "AUX-01" or "XM CH-001", then it worked! Go ahead and plug an audio device to the aux input to hear something. You may have to turn up the device's volume and the radio's volume. Let's pretend these steps worked so we can move forward.

Step 20 - screw the radio back to the dash harness (reverse step 7). Try to keep all wires down and away from the HVAC system as possible.

Step 21 - place the HVAC vents back into place on the dash (reverse step 6). It should wedge its way back to the original position.

Step 22 - place and screw the HVAC controls back into place (reverse step 5 and then step 4). Good thing you haven't lost the screws, right?

Step 23 - replace the the HVAC molding (reverse step 3). It will snap back into place ever so gently.

Step 24 - take a deep breath, pat yourself on the back, and revel in the awesomeness of your Altima's auxiliary input.  Now I can run my MP3 player through the car's speakers or my MP3/bluetooth-enabled GPS.  Better yet, both can be connected at the same time, just switching input choices to hear one or the other.  Solid!


Senin, 17 Januari 2011

My Fingernail, I Hardly Knew Ye

"The biopsy came back negative."

Five days after my nail bed biopsy, the hand surgeon gave me the great news. I only had a bruise on my nail bed; a stubborn, stubborn bruise that thought it'd be fun to leave a streak in my fingernail and cause me to learn far too much about subungual melanoma. Thanks to a solid family history of cancer, I had to be vigilant and proactive. Ignoring health concerns do not heal them.

I learned quite a few things from this experience. For one, I don't know how to put on a woman's dress. The nurse told me my patient gown is "simply put on with the tie in the back as you would with a woman's dress". When she returned to tie the gown, I had it on backward. For the nurse's sake, I made sure the ties were double-knotted so I had no chance of giving the staff an IV-fueled burlesque show with a twirl.

I learned that the best nurses are from New Jersey, right mom? My surgical nurse and I bonded over tales of northern NJ diners, accents, and Turnpike traffic.

I learned that telling the anesthesiologist that redheads require a higher dose ensures that I'll be knocked out really well. A few seconds after I felt the anesthesia in the IV, the operating room ceiling faded to black. When I awoke 20 minutes later, I was in a different bed, with sheets wrapped around me, and I couldn't feel three of my fingers for at least another hour. I'd much rather have it that way.

I learned that hospital beds aren't long enough for me. Like every sleeping camp bunk bed, my feet dangled over the edge. If there are going to be wider wheelchairs for overweight patients, there should be longer beds for taller patients. Equal rights for above average height!

I learned that Holy Cross Hospital gives patients great socks for surgery.  They kept my feet warm and gave me great traction.

I learned one way to get a turkey sandwich at the hospital is to have staff use a blood pressure cuff that's too large for my arm resulting in a low reading. Hello lunch in a box! A quick resizing showed my numbers were plenty normal, but not before I got to stuff my face for the first time that day.

I learned that when a surgeon goes to tell your girlfriend his preliminary observation that I don't have melanoma, she shouldn't be left in "The Grief Room" for more than a nanosecond until he arrives. When other rooms are full, as was the case here, just wait a few minutes until the, "Nothing to Worry About Room" is available.

I learned that my body definitely gets nauseous from anesthesia. Hello lunch in a box, not so nice to see you again!  I was so nauseous that I wasn't able to eat the matzoh ball soup and homemade kugel waiting for me at home.  It pained me to wait one whole day before taking in those calories.

I learned that codeine is wonderful no matter its one-day side effects.

I learned that having a fingernail and part of your nail bed removed makes for a gnarly story.

I also learned that my fingernail will grow back to the fingertip in four months and will look healthy again in 9-12 months. That's a small aesthetic price to pay for peace of mind.